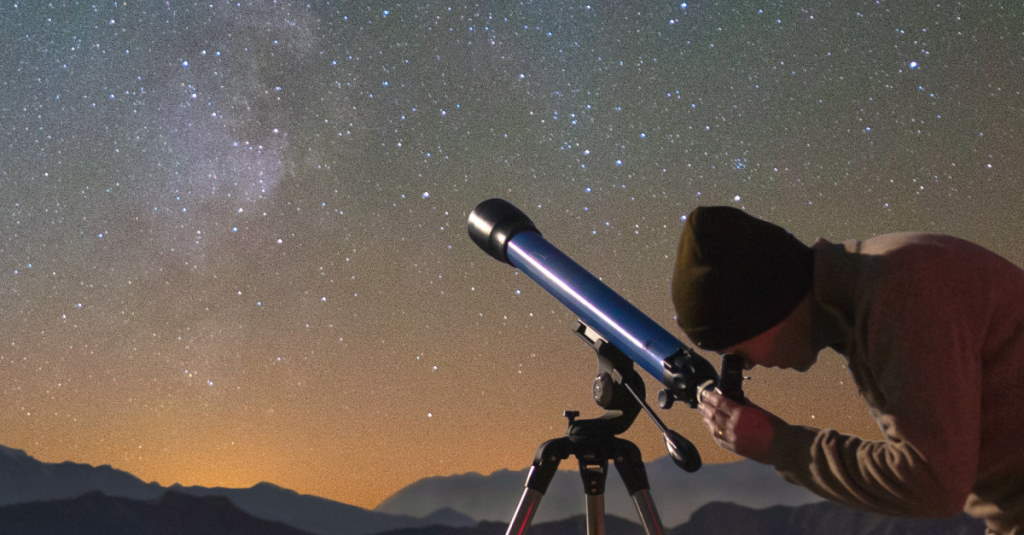
Are you thinking about purchasing a telescope? Before you start your search for a particular model or brand, take some time to get to know the ins and outs of this instrument as well as the criteria for your choice!
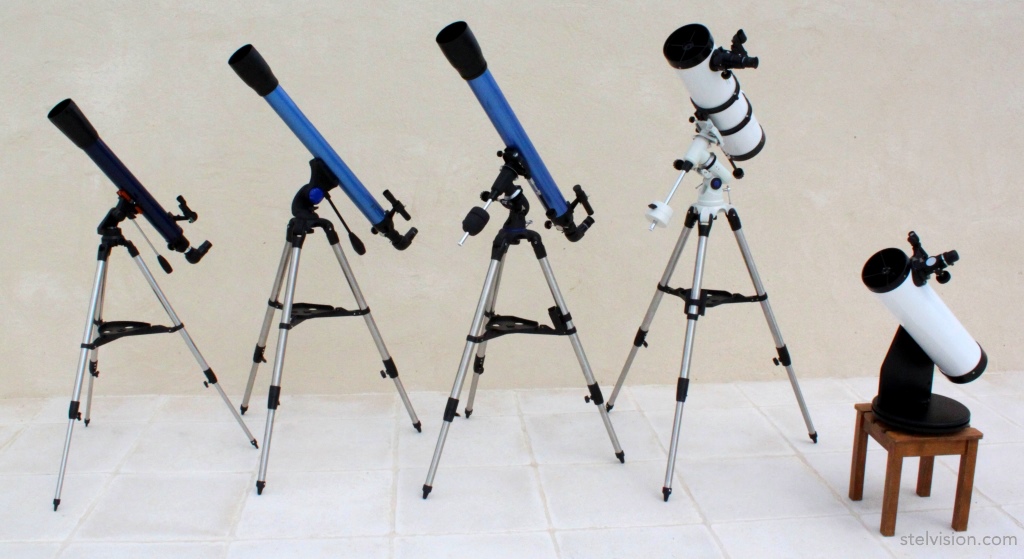
Refracting telescopes, reflecting telescopes…there’s a variety of choices! Here are some beginner telescopes you can buy on a budget. You’ll see here two 70mm altazimuth refractor telescopes, an 80mm equatorial refractor telescope, a 130mm equatorial reflector telescope, and a 100mm tabletop Dobsonian reflector telescope. Photo: Stelvision.
Is there a telescope that’s ideal for beginners?
Not really. Every choice depends on the level of performance you’re looking for, the practicality of the telescope, your observation preferences…and, of course, your budget.
Take some time to learn the basics and ask yourself the right questions. Once you’ve figured out what kind of telescope is best for you (or a loved one you’ve been discreetly trying to question!), you’ll feel more comfortable when making your choice.
Table of Contents
Optics | Mount | Accessoires
Possible Choices According to Function and Budget
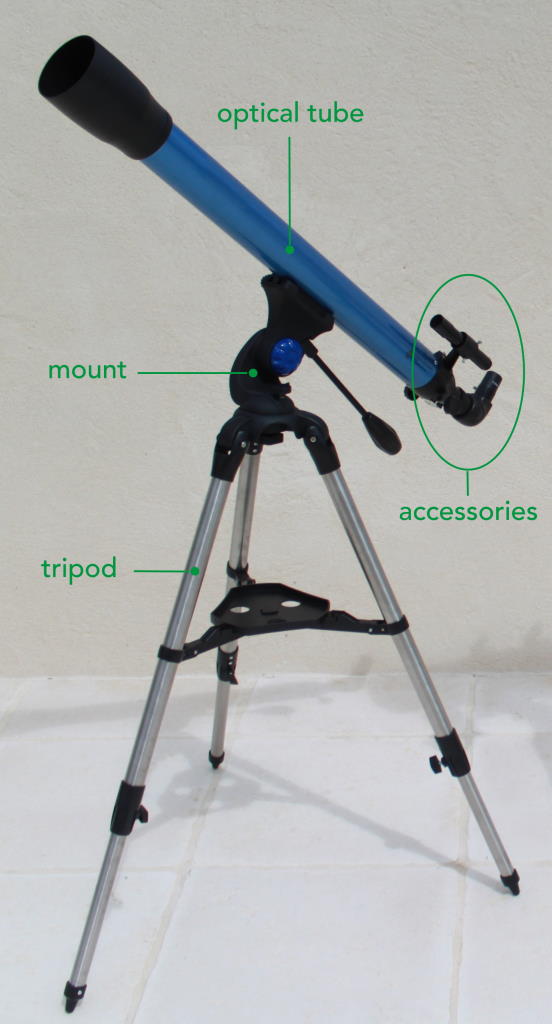
The different parts of telescope. Photo: Stelvision.
Overview of a Telescope
Both refractor and reflector telescopes include:
- an optical tube, which is the main part of the instrument and creates the images of the stars;
- a mount, which supports the optical tube and allows it to be turned towards a specific direction. Mounts generally come with a tripod;
- accessories, the most important being the eyepieces and the finderscope (or red dot finder).
Make sure you carefully consider these different parts before you make your choice, since a good optical tube won’t do much good if the mount is unstable or not very accurate. Your telescope should also be equipped with quality accessories. These can come with your instrument or be purchased separately.
Now let’s take a look at each part…
Optics
The optical part of telescope has two roles.
- First off, it amplifies the light coming off from the stars and reveals what the naked eye cannot see (for example, a distant galaxy).
- It also magnifies the objects observed to reveal details that are invisible to the naked eye (such as the Moon’s craters, Saturn’s rings, etc.).
Reflector or refractor telescope?
Reflector and refractor telescopes work similarly, though their designs are quite different.
- A refractor telescope uses an optical lens, which is placed at the front of the optical tube. This is known as the objective.
- A reflector telescope uses mirrors, which is placed at the back of the optical tube.
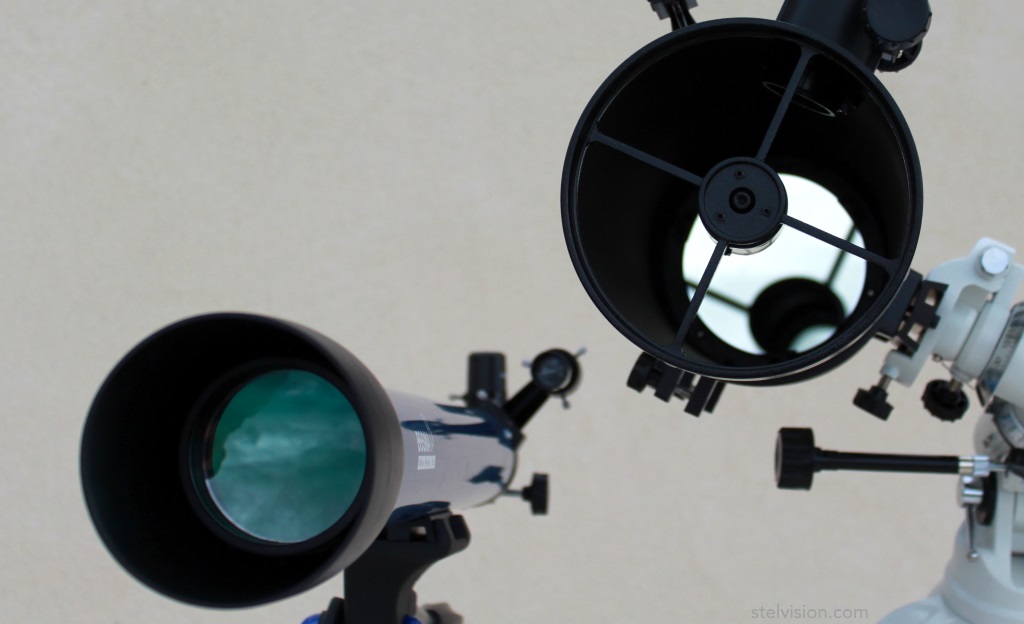
The refractor telescope on the left has its lens at the front of the optical tube. The reflector telescope on the right has its mirror at the back of the optical tube.Photo: Stelvision.
How does a refractor telescope work?
The light produced by the stars passes through the telescope’s objective lens and comes together where the eyepiece (a kind of magnifying glass) is placed. This eyepiece makes it possible for the eye to see the image at either a higher or lower magnification, which depends on the type used. A refractor telescope is also equipped with a star diagonal, which is added before the eyepiece. A star diagonal bends the light path a 90° angle to make observation much more comfortable when the telescope is pointed at the sky.
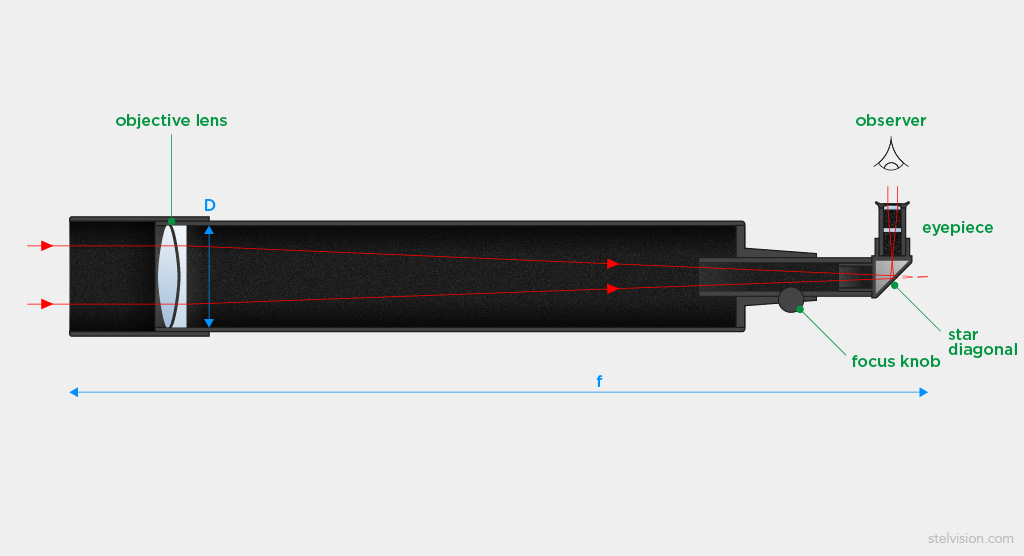
Diagram of how a refractor telescope works. Illustration: Valentine Dubois – Stelvision.
Scroll further down the page to learn more about a telescope’s two main optical factors, indicated in blue in the diagram above (the aperture “D” and the focal length “f”).
How does a reflector telescope work?
The light produced by the stars is reflected in the telescope’s main mirror (known as the primary mirror). This mirror has a parabolic shape and is used to gather and concentrate light, which is reflected towards the front of the optical tube. A secondary mirror is then used to reflect this light up to make moving about possible without obstructing the open end of the telescope. The eyepiece at this point produces and magnifies the image.
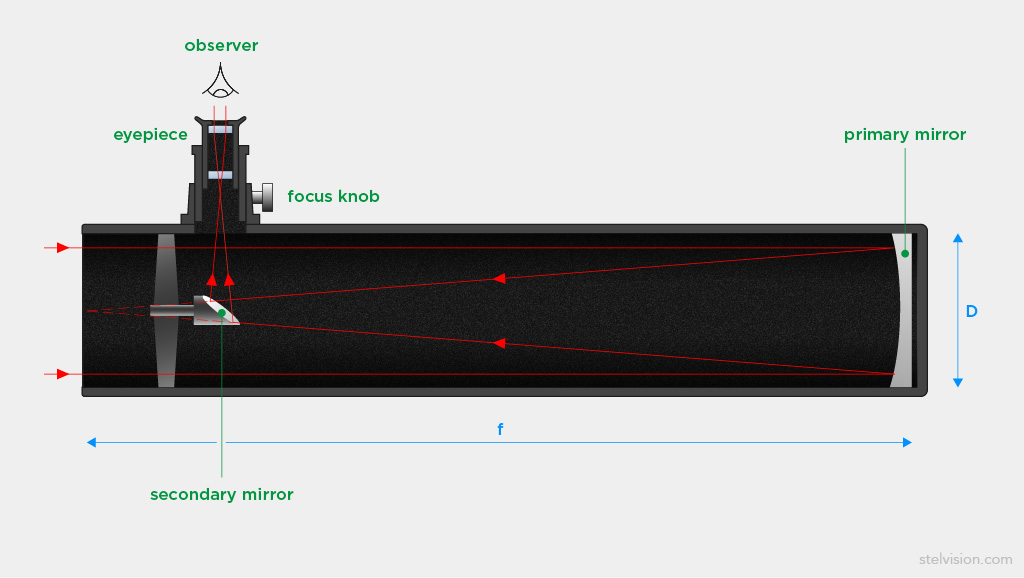
Diagram of how a reflector telescope works (also known as a Newtonian design). Illustration: Valentine Dubois – Stelvision.
And this is how the classic type of telescope (also known as the Newtonian) works!
Another type of reflector telescope exists (known as a catadioptric telescope). This allows stargazers to observe from the end of the optical tube (like a refractor telescope) rather than from its side. The secondary mirror in this case reflects the light towards the center of the primary mirror, which has a hole so it can pass through and be viewed through an eyepiece. Schmidt-Cassegrain and Maksutov-Cassegrain telescopes, using this type of design, are therefore compact, since the beam of light more or less folds into itself. The primary mirror in this type of telescope is spherical, while the secondary mirror is convex. A lens, known as a corrective plate or a meniscus corrector, is placed at the open end of the optical tube to correct the spherical aberration.
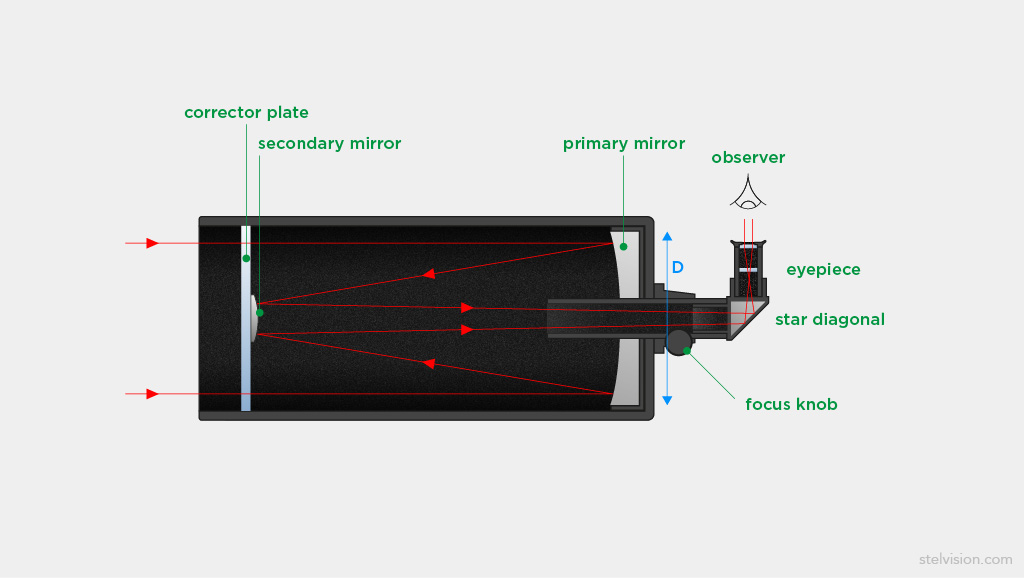
Diagram of how a Schmidt-Cassegrain or Maksutov-Cassegrain telescope works. Illustration: Valentine Dubois – Stelvision.
Is one telescope better than another?
Beginners usually opt for refractor telescopes, which are slightly easier to use than reflector telescopes. A reflector telescope will actually need to be aligned from time to time to get the best image. This process is called collimation. While it is not difficult to adjust the reflector mirrors, it can admittedly be confusing for beginners.
But when telescopes get to be a certain size, reflectors come out on top for their cost. This is because a mirror is easier to make than a good refractor objective.
The Most Important Factors of Your Telescope: Aperture and Focal Length
Both refractor and reflector telescopes depend on two main optical parameters to portray their power.
- The first is the aperture, or the diameter of the lens or mirror (D), generally expressed in millimeters.
- The second is the focal length (f).
A telescope is often described with reference to its aperture and focal length. For example, a telescope with an aperture (or diameter) of 70mm and a focal length of 900mm will be presented as “70/900 telescope”.
The aperture is the most important thing to consider when evaluating the power of a telescope. If budget isn’t an issue, it is best to go for an aperture that is as big as possible since:
- the diameter of the aperture determines the images’ brightness. The bigger the scope, the more light it gathers
- the diameter also determines the images’ amount of detail. Under ideal conditions (flawless telescope, stable atmosphere), a diameter doubled in size will reveal twice as much detail.
Basic telescopes for beginners usually have an aperture between 60 and 150mm (60-80mm for a refractor telescope, 100-150mm for a reflector telescope). After a few years of stargazing, deep-sky enthusiasts may start thinking of getting larger scopes (of 250mm up to 400mm) in order to explore even more distant galaxies or faint nebulae in the sky.

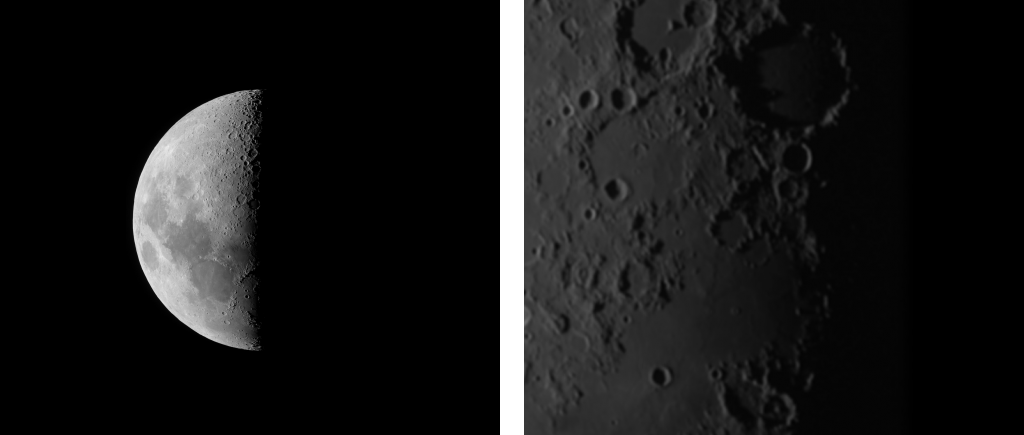
Simulation of an observation of the Moon with two scopes of very different diameters (60mm and 300mm). A telescope’s aperture influences both the brightness and the amount of detail. This simulation has been made with the Stelvision simulator. Feel free to use it to determine what you’d be able to see in a telescope according to its aperture!
The focal length determines:
- the telescope’s magnification. The longer the focal length, the greater the magnification (but watch out! As you’ll see later, high magnification is not always the best).
- the telescope’s size.
A standard refractor telescope is always pretty long. Its focal length is about 10 to 13x its diameter (for example, a diameter of 60mm will have a focal length of about 700mm). This is necessary to get decent images within a reasonable budget. Most refractor telescopes suffer from a defect called chromatic aberration. This creates the appearance of colored borders around the edges of the image and also results in a loss of sharpness. This phenomenon is not noticed much with long telescopes, though it can often be seen with shorter optical tubes (except with pricier models that use sophisticated optical design).
A Newtonian telescope can have a short focal length if its primary mirror is indeed a parabolic mirror (and not a spherical mirror found on cheap models). For example, a decent telescope with a diameter of 200mm can have a focal length of about 5 to 6x, or 1,200mm, and still work well.
Schmidt-Cassegrain and Maksutov-Cassegrain telescopes have a long focal length despite their compact appearance.
What magnification should I strive for?
Just to be clear, magnification is not really a factor to consider when you’re choosing your refractor or reflector telescope. Telescope magnification actually depends on the eyepiece used. A telescope always comes with several eyepieces upon purchase, and you can always buy more separately if you’d like to have the full range of magnification possible. Magnification is therefore an adjustable parameter on your telescope.
Also, don’t assume that a telescope should magnify as much as possible. In many cases, low or moderate magnifications can be much more appropriate than high magnifications. In fact,
- high magnification makes the image less bright
- it causes the overall view to be lost by narrowing the field of view
- it can cause the image to be blurred due to what is known as the telescope’s diffraction limit (resolution limit). This is inversely proportional to the aperture’s diameter, which means that any magnification greater than 2x the telescope’s diameter should be avoided. A magnification of 1 to 1.5x the diameter is therefore best.
You should also know that the atmosphere is rarely completely stable. Have you ever seen the haziness that floats over a hot asphalt road? Well, highly magnified images in a telescope will have the same hazy effect, due to the atmospheric turbulence which prevents small details from being seen. And the higher the magnification in this type of atmosphere, the hazier your images will get.
You can have some great views of the Moon with a small 60mm telescope used at low magnification. Higher magnification is possible, but the image becomes dark and loses its contrast and sharpness. Simulations: Stelvision telescope simulator.
Low magnification is used to observe the Milky Way and many deep-sky objects such as star clusters, nebulae, and galaxies in order to keep things bright and in a large field of view. If you would like to see the Moon and planets in greater detail, you can boost magnification to 100-200x if your telescope and the atmosphere allow it.
Note that you can already see Saturn’s ring and various lunar caters with a modest telescope with a magnification of 50x.
The Mount
The mount has several uses that are all very important.
- First off, it supports the telescope and keeps it as stable as possible (which is crucial, since any vibration hinders observation, especially at high magnification). So, avoid weak-looking mounts on tripods with flimsy legs, since they may be quite unstable.
- The mount also allows you to point your telescope towards a specific part of the sky. Because the field of view is quite narrow, you’ll need something with which you can be accurate!
- A mount can also eventually help you follow stars as they move across the sky.
There are three different types of mounts: altazimuth, equatorial, and Dobsonian.
The Altazimuth Mount
The altazimuth mount is the easiest to use of the three types of mounts. It allows you to move your telescope up and down, and from side to side. A good altazimuth mount if perfect for anyone looking to keep things simple and not interested in astrophotography.
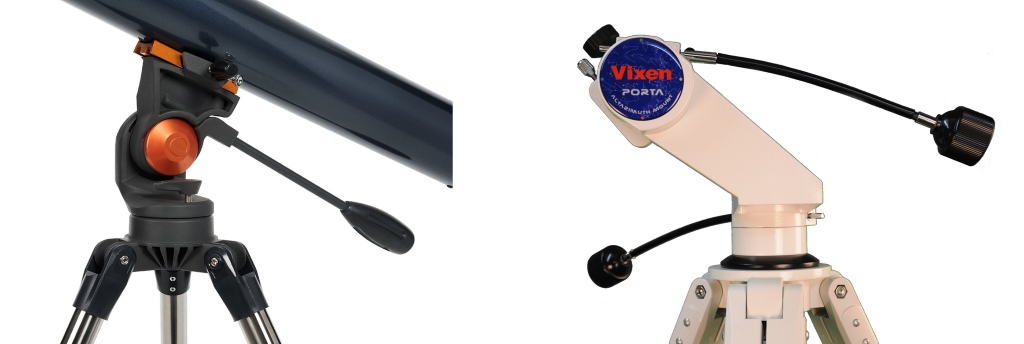
Here are two examples of decent altazimuth mounts. On the left, there is a simple swivel mount, similar to a camera stand. On the right, there is a altazimuth mount that comes with flexible slow motion cables for fine-tuned pointing. The latter is more accurate and comfortable but much more expensive. Photo credits: Celestron, Vixen.
The Equatorial Mount
The rotation of the Earth makes the stars drift across the sky. This movement is further amplified by the magnification of a telescope, so that the star in focus tends to flee from the field of view in little time! You’ll therefore have to follow the star as it blazes its trail. An altazimuth mount will require you to maneuver both the up/down and side/side movements at the same time, whereas an equatorial mount allows you to track your celestial object much more comfortably. The rotation of its axes (with one axis oriented parallel to the Earth’s axis of rotation) makes adjusting easy on the fly. You can even add an electric motor to your equatorial mount, which will automatically track your star and allow you to concentrate on observation!
This mount’s graduated circles in declination and right ascension (equivalent to latitude and longitude in the sky) also give you the opportunity to become familiar with celestial coordinates. These coordinates can eventually help point out the stars that are difficult to find, provided that the mount is accurately set up.
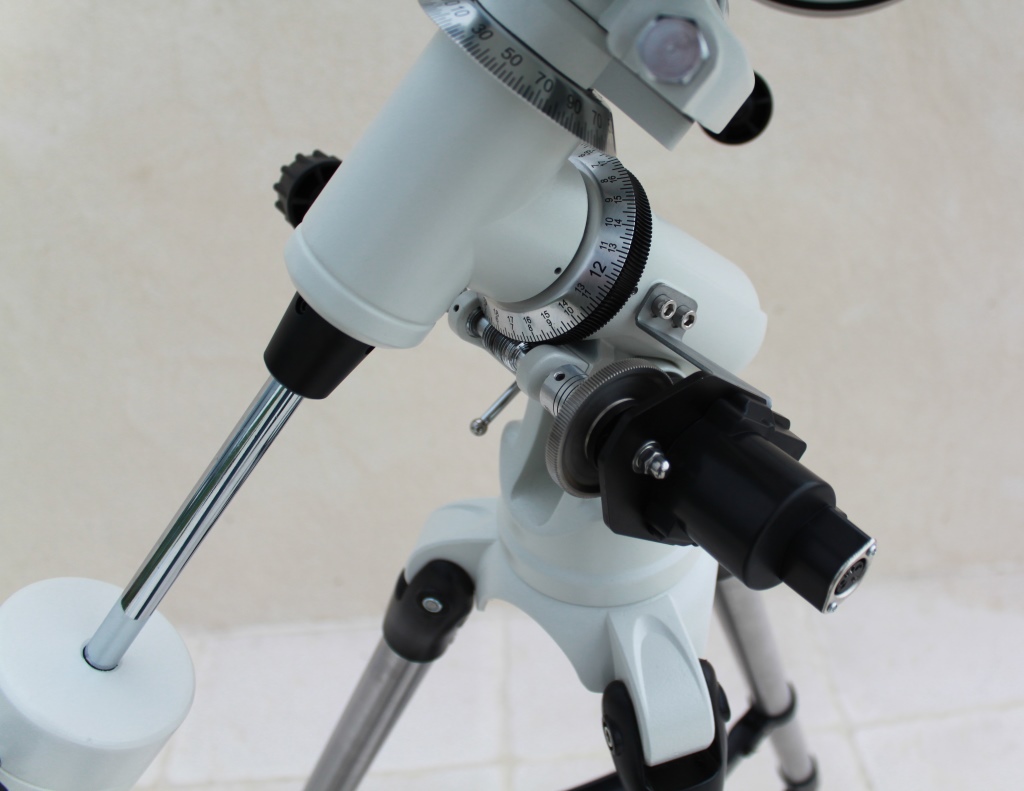
A German Equatorial mount. This very common model can be recognized by its counterweight (bottom left) and its graduated circles indicating the celestial coordinates. Here the mount is equipped with a motor (black box on the right) so stars can be automatically tracked. Photo: Stelvision.
An equatorial mount is a must for amateurs in astrophotography. Mounts used for astrophotography must be stable and accurate enough to guarantee good tracking and fluid movement during photographic exposures. Decent standard mounts will allow any aspiring astrophotographer to get initiated. However, more experienced stargazers with higher expectations may end up getting high-precision mounts that are particularly expensive.
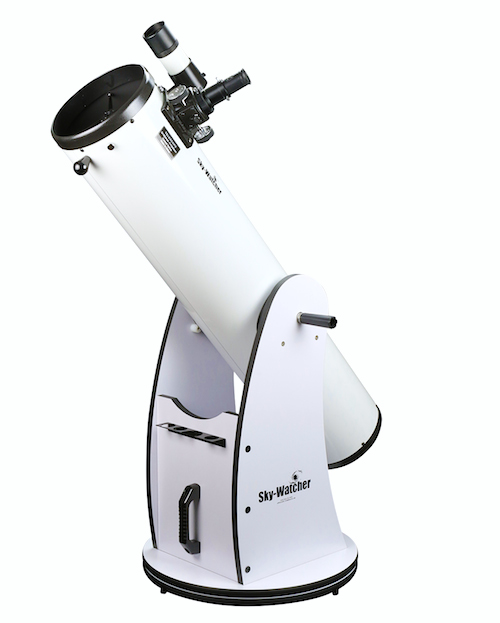
A Dobsonian telescope with a 200mm aperture. Photo: Sky Watcher.
The Dobsonian Mount
The Dobsonian mount is a variant of the altazimuth mount but made without a tripod for a simple yet efficient design. We call any kind of telescope equipped with such a mount a “Dobsonian.”
The mount, which is usually made of wood, is directly placed on the ground. You simply need to push the telescope up and down or side to side to direct it where you wish. A basic swivel mechanism ensures surprisingly accurate pointing. This type of mount is relatively cheap and therefore greatly appreciated by observers on a tight budget looking for a telescope with large aperture.
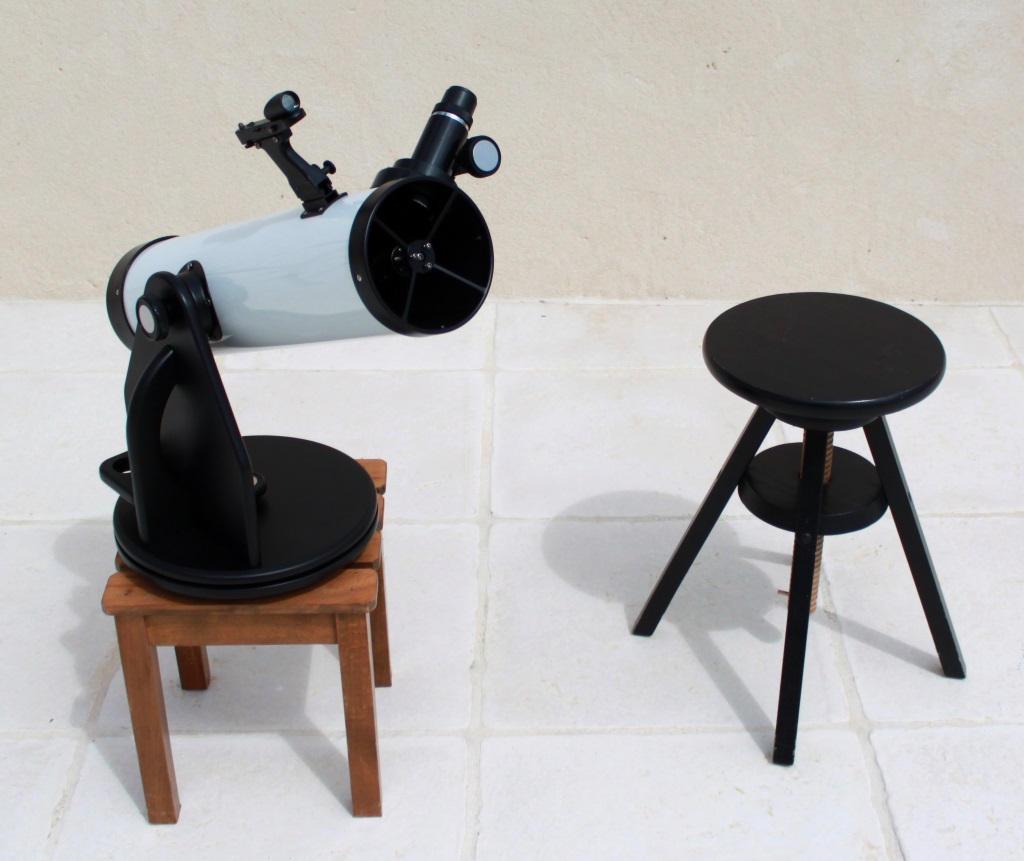
There are also small tabletop Dobson models available. With a diameter of about 100mm, their compact size makes them appealing and they can be a great first telescope. You can also place your mount on a stool if you don’t have a table to use. Photo: Stelvision.
“GoTo” Mounts
Some motorized mounts are equipped with related computer software known as “GoTo,” which can automatically point your telescope to whatever celestial coordinates you input in the system!
But take note! It can be quite costly, and the system only works if you pre-align it before use. So, you still have to put in a bit of effort before you begin your stargazing adventure—and don’t forget it’s also nice to know how to navigate stars armed with nothing other than a sky map!
Accessories
Eyepieces
Eyepieces are essential components of a telescope, though they are considered “accessories” since you can change them to vary your telescope magnification and field of view. The purpose of an eyepiece is to magnify the image projected by the telescope’s objective, and the magnifying power is directly related to the focal length. The magnification of an eyepiece is the following:
Magnification = fO / fE
*fO is the focal length of the objective, fE is the focal length of the eyepiece.
For example, a telescope with a focal length of 900mm, equipped with a 9 mm eyepiece, gives a magnification of 100x.
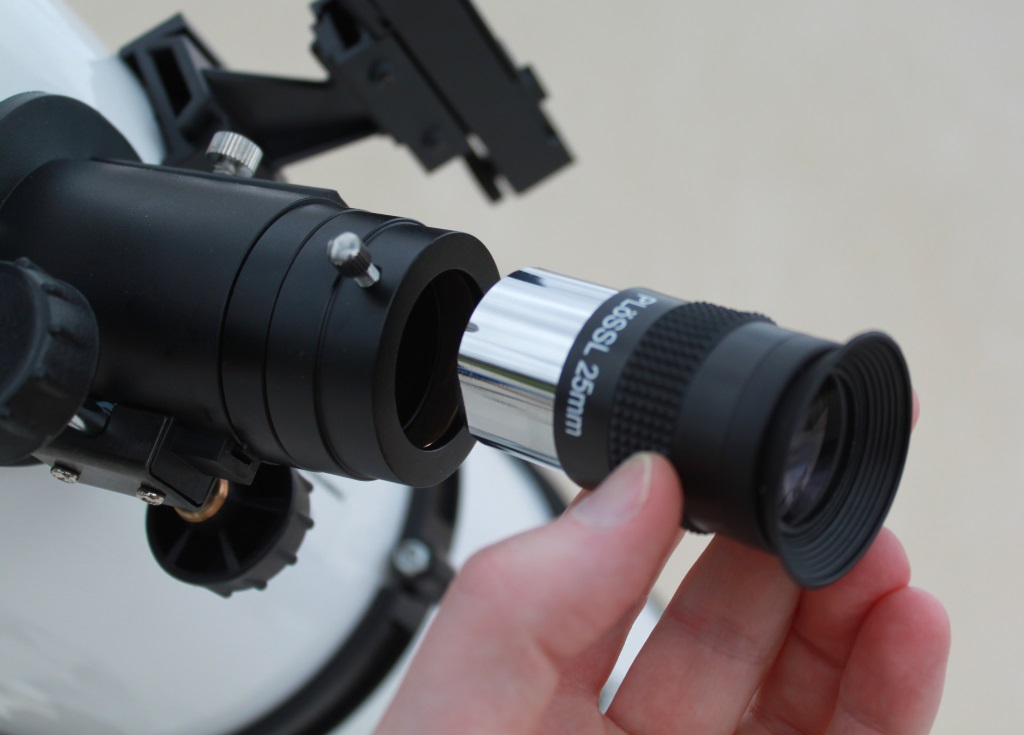
Mounting an eyepiece to a telescope. The focal length is always indicated on the eyepiece (here 25mm). Photo: Stelvision..
A telescope often comes with two eyepieces. Usually, one of these eyepieces will offer a long focal length (of about 20 to 25mm) for low magnification, which is useful for pointing and viewing extended objects. The other eyepiece will generally have a short focal length (of about 6 to 10mm) for high magnification.
Choosing Your Eyepieces
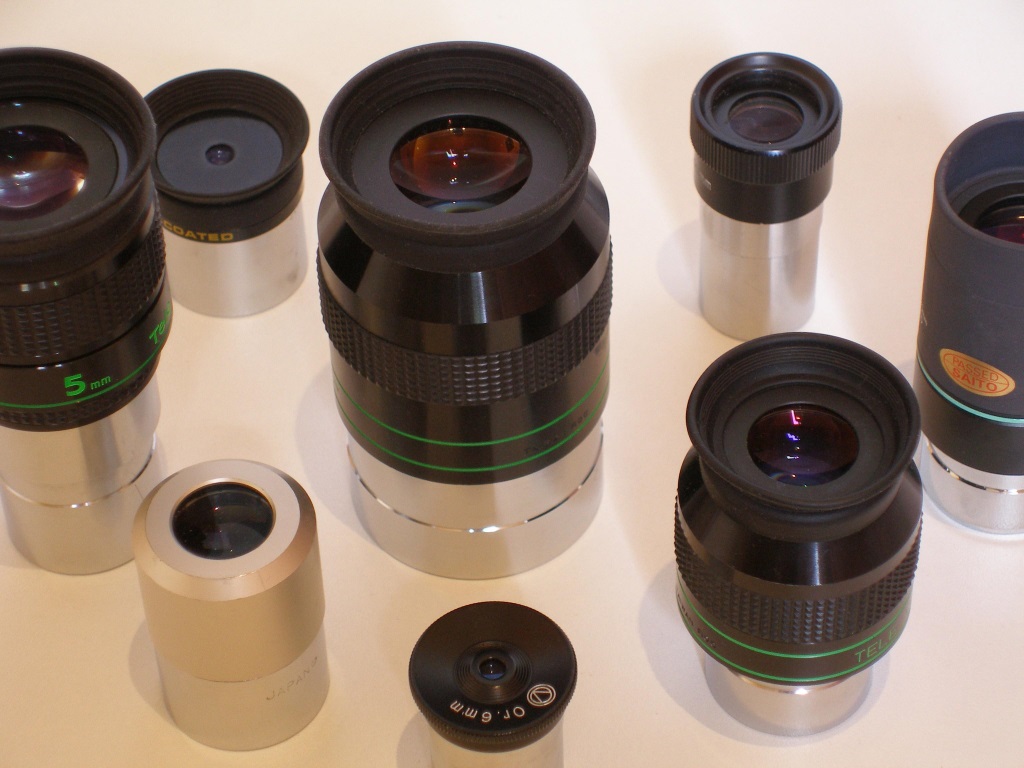
Many types of eyepieces exist. Photo: Stelvision.
You will likely start off by using the eyepieces that come with your telescope. Unfortunately, they are often quite basic (particularly with cheaper telescopes) and offer little range. However, you can at least use these to kick start your stargazing adventures and while you become familiar with your telescope. You can always complete your range later on, choosing between stronger, weaker, intermediate, better quality, or even widefield eyepieces for a better feeling of immersion. Find out exactly what you are looking for so you don’t have to waste time or money on unnecessary eyepieces.
Barlow Lens
This accessory is meant to be added to an eyepiece to double or triple the magnification (Barlow 2x or 3x). A good Barlow lens is quite useful for a telescope with short focal length. But remember, there is no point in trying to magnify beyond a telescope’s limit.
Finder
A telescope always has a restricted field of view compared to what you can see with the naked eye or binoculars. Pointing with complete accuracy can therefore be quite difficult, which is why your telescope will always come with a helpful aiming device. There are two types you can choose from.
- The first one is a finderscope, which is a small telescope that is equipped with a reticle (similar to a precision rifle with crosshairs). This is mounted on the main telescope.
- The second is a red dot finder, which “projects” a red dot or circle in the sky. (In reality, this red marker is projected on a glass window integrated in the device, though to us it looks like it is cast off amongst the stars).
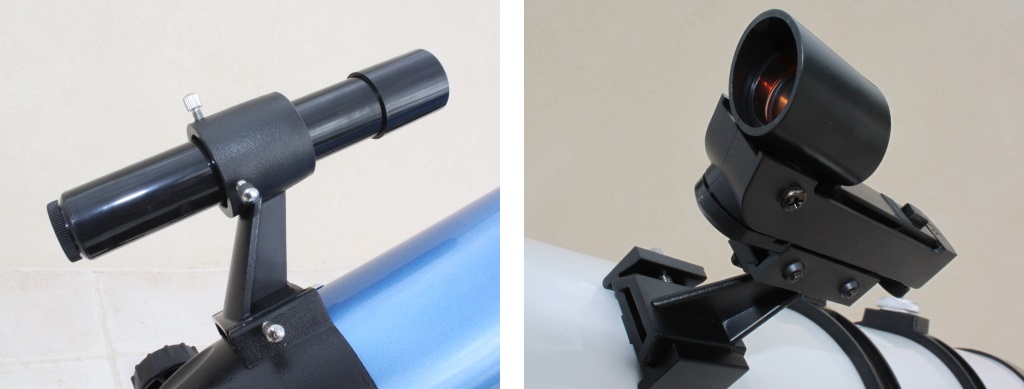
A finderscope to the left. A red dot finder to the right.
A finderscope, like binoculars, amplifies the light and magnifies the images. In theory, it’s ideal if you’re looking for an extremely particular location. However, you should know that most finderscopes give an inverted image, which can make them difficult for a beginner to get the hang of. They can also be somewhat difficult to adjust, since the finderscope must be carefully aligned with the telescope via several screws.
A red dot finder is often easier to use since it does not magnify or invert the images. You’ll see the same sky in your telescope as you do with the naked eye. It is also generally easier to align on to the telescope. These two things can certainly make a difference when it comes to telescope convenience!
Possible Choices According to Use and Budget
There are tons of telescopes on the market to choose from. Here are just a few classics ranging from various types of budget to help you find your first telescope. Please note that the optical and mechanical quality (such as tripod and mount stability) can vary for even the same category of telescope. You might also want to check which accessories (like eyepieces or a motor drive) come with the telescope you’re interested in.
For a Budget Less than €200 (or $200)
- 60 or 70mm altazimuth refractor telescope with focal length of 700 to 900mm. A great classic to start off with! It provides pretty good details of the Moon’s surface and gives a nice overview of the main planets (even in cities). With this type of telescope, you’ll be able to see Saturn’s rings, Jupiter’s cloud bands, and views of Mars and Venus. If used under a clear country sky, this telescope reveals a few dozen interesting deep-sky objects like star clusters, nebulae, and galaxies.
- Good to note: models at the low end of the range often have unstable and inconvenient mounts. You’re better off going for a model that has a sturdy base and swivel mount. And unless you have a particular budget or space constraint, you might want to purchase a telescope with a 70mm aperture.
For a Budget Between €200 and €500 (or $200 and $500)
- 114mm equatorial reflector telescope with focal length of 900mm. This is another classic, which is more powerful than the 60 or 70mm altazimuth refractor telescope, but also a bit more complex due to its equatorial mount and occasionally required collimation. Once upon a time, the 114mm telescope was the standard beginner’s telescope. Since then, prices have dropped and the 130mm telescope has taken the lead since it is more powerful.
- 130 to 150mm equatorial reflector telescope. With this type of telescope, you can observe many details on the Moon’s surface and main planets (even in cities). You’ll also be able to see the irregularities in Jupiter’s cloud bands as well as its famous Great Red Spot. The main gap in Saturn’s rings will also be visible with this type of telescope. If used under a clear country sky, this telescope reveals about a hundred interesting deep-sky objects like star clusters, nebulae, and galaxies. The equatorial mount, once correctly aligned, makes tracking stars easy and gives you the opportunity to learn about celestial coordinates. This telescope also makes observation comfortable and astrophotography initiation possible when the mount is furthermore equipped with a motor.
- Good to note: 130 / 900 telescopes are popular and are attractive in price, but standard models generally come with a flimsy mount and tripod. And vibrations are amplified by the telescope’s relatively long length. You’re better off going for a telescope with a shorter focal length (130 / 650). It is more stable, especially if it comes with a sturdy tripod and a good mount. Plus, you’ll have a telescope that’s more compact and easier to transport. But take note! A 130 / 650 model needs to be equipped with a real parabolic mirror. Some models at the low end of the range come with a simple spherical mirror, which is cheaper but doesn’t have the same type of quality with a short telescope.
- 200mm Dobsonian telescope. Boasting an aperture of 200mm, this reflector gives you the chance to see even more details of the Moon’s surface and planets. Atmosphere stability must still be favorable, and this can change from day to day. If used under a clear country sky, you can truly see the potential of this telescope. It reveals about 200 interesting deep-sky objects like star clusters, nebulae, and galaxies. The mount is simple to use, though it does not offer equatorial tracking and therefore not the best for photography. This telescope is only intended for observation, especially of the deep sky, which is wonderful if you live in the country or can easily get there by car (but take note! this telescope is pretty big and relatively heavy!).
For a Budget over €500 (or $500)
Amateur astronomers generally purchase telecopes in this budget range after a bit of stargazing experience.
200mm equatorial reflector telescopes, 250mm or more Dobsonian telescopes, 150mm or more compact telescopes such as Maksutov or Schmidt-Cassegrain, apochromatic refractors for a high-quality telescope with short tube length… the possibilities are endless! But if you don’t truly know what you are looking for, you might be better off starting with one of the telescopes mentioned above. After you have a few years of experience under your belt and can get a better idea of what’s out there thanks to encounters with other stargazers and amateur astronomers, you may want to go for more powerful equipment to dive deeper into your celestial explorations. You can always resell your first telescope second-hand (since a telescope hardly wears if properly taken care of) in order to acquire the new one of your dreams! And if you like to DIY and have a bit of patience, you can even make your very own dream telescope by following the advice of experienced amateur astronomers.